Thursday, June 23, 2011

Do you LOVE fabric?

I know, silly question.

If you are reading this you probably sew in your sleep like I do...

because you LOVE fabric too!!!

Well, if you LOVE fabric, then you are going to LOVE what's new this week!


Pirates by Emily Taylor for Riley Blake Designs

 THE ENTIRE COLLECTION!

Isn't it TO DIE FOR!!  I almost contemplated not listing it all in the shop because I wanted to keep the entire collection for myself. But because I love you all so much, HERE it is!
"BEWARE, MATEY!", don't wait too long to order, it's going quickly!

Alphabet Soup by My Mind's Eye for Riley Blake Designs

THE ENTIRE COLLECTION!

Perfect for little ones!  I can totally see the Argyle Star prints for little boy's ties!

We also have the Fat Quarter Sets in both the BOY and GIRL collections!


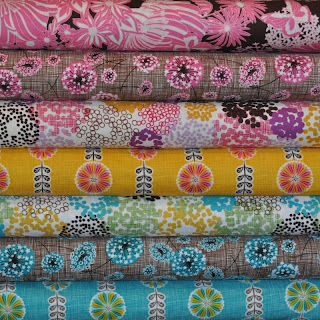
 We also received some more fabulous prints from Michael Miller Fabrics.


 Click on any image to take you to it in the shop!

Summer time around here means FABRIC!!!

We have added so many amazing collections during the month of June, and let me tell you...

JULY is going to knock your socks off!!!

See for yourself HERE!

Now, put your socks back on and head on over to the shop for some 

SUMMER FABRIC LOVIN'!

Monday, June 20, 2011

Project Nursery- Ruffle Valance

Okay, I admit it, I was a bit of a slacker this last week.
So here it the tutorial I promised for last Friday :)

The window was really plain and sad without a curtain, so I decided to remedy that!

*I bought a curtain rod at Walmart
* and I used 46" of fabric

I wanted my finished curtain to be about 92"x 22". My window is only about 45" wide, but I wanted it to gather and be ruffly, so I double the length I needed.

So I took my 46"x44" piece of fabric, and cut it straight down the fold, giving me (2) 46"x22" pieces.

Then I sewed them together. Giving me (1) 92"x22" piece. 

Along the bottom of the valance, I folded over 1/4" and pressed it down.

Then I folded that 1/4 inch down another 1/4 inches and pressed it down as well.

Then I just straight stitched all the way along the bottom to finish the edge. 
I repeated this step along the top of the valance, and both sides as well.

Next, at the top of the valance, I folded down the finished edge 3", and pressed it flat. 

And sewed a straight stitch all the way across the top of the valance, close to the edge.

My curtain rod was about 1" in diameter, so then I moved up from my finished edge about 1.5" and sewed another straight line all the way across the top of the curtain. Making the casing that the rod will fit into. 

 Having that extra 1.5" across the top of the valance made a cute little ruffle!

Here is the finished product!

The nursery is just about finished and I can't wait to show you all the whole thing!

Happy Sewing!

Tuesday, June 14, 2011

Recovering

My little guy turned 5 this weekend!

and I am still recovering from the 3 day party!

Hopefully I will be back up to par soon...

but until then, here a little bit of what is new in the shop!

Hoo's in the Forest from Riley Blake Design arrived last week!

And the precuts are here too!

Fat Quarter Sets
5x5' Squares
&
10x10" Squares


Hopefully I will be back by the end of the week with another tutorial for
Project Nursery!

Tuesday, June 7, 2011

Project Nursery-Recovering Canvas Bins

My Changing table has 3 little cubbies, and it just so happened that I had 3 Cream Canvas Bins that I bought at Walmart years ago. 

I decided that cream bins in white cubbies might be a little BLAH!

So here is what I did!

1. I took the cover off the wire frame.  Luckily these covers are removable with velcro all around the top to hold it in place. 


2. Then I used my handy dandy seam ripper to take off the handles and the tag holder. (This is totally optional) I just didn't want to be able to see them through the fabric once the bin was covered. 

3.  Time to Measure & Start Cutting

I measured the canvas cover and came up with this:

Cut 1 Bottom
 1 Front, and 1 Back Piece

and 2 Side Pieces

 My measurements were rough estimates, and they worked out okay.  They were a little small, so you may want to really measure your bins well to make sure you are getting the right dimensions. 

4.  Next I sewed the Bottom Piece, to the Front and Back Pieces. I used 1/4" seam allowance. 

 5.  Then I sewed the 2 side pieces on. I just started with the front seam, moved along to the bottom seam, and then went back up the backside seam.  The corners are a little tricky, but not too bad :)

 6.Once the sides are on, I tried it on the bin. I put my canvas back on the wire frame and then just place my new cover over top. My covers were made with quilting weight cotton, so I wanted to keep the canvas cover to make it sturdier. 
My original plan was to sew it to the canvas cover, but then I realized that was WAY too much work :)

I simply folded down those raw edges along the entire top opening of the bin and glued them to the inside of the canvas liner. ( I used Modge Podge) They are not really washable, but I have had these bins for like 5 years and never needed to wash them before, so I figure I won't really have the need in the next 5 years either. :)

Aren't they cute?
As you can see, I have already filled them with the necessities.

 You can add handles, or embellishments if you want!

The completed Changing Corner

Now all I need is a little bum to change :)

6 Weeks To Go!

Friday, June 3, 2011

What's New

Well,
besides the new look of the blog...

We have gotten in some serious goodies this week!

Appleville by Suzanne Ultman for Robert Kaufman Fabrics
 I am not sure I can accurately describe how adorable the Appleville Scene is!


Also just in from Robert Kaufman Fabrics is

and these two buddies are also restocked!

 We recieved our first ever Organic Cotton collection this week too!

by Wooster and Prince
for Robert Kaufman

Exquisite!

 Lola's Posies from Riley Blake Designs is here too!
 All this fun fabric in one week...

it was almost more than I could handle :)

And next week is looking good too!

We are set to recieve
Hoo's in the Forest from Riley Blake Designs!

Are you as excited as I am!

There are still a few tweekings to be made here on the new look of the blog, so don't be weary if things keep a changing!

Have a great weekend everyone!


Related Posts Plugin for WordPress, Blogger...